
Most of my work with IBM Security Access Manager (ISAM) has been with virtual appliances, but earlier this year I had the opportunity to set up an ISAM Version 8 hardware/physical appliance. So the question is: how do you connect to the console of a hardware appliance, in order to perform the initial configuration to set the management IP address, etc? Obviously if you’re using VMware you can access the virtual appliance console – but how do you connect to the console of a hardware appliance? There are a number of things that I learned in the process, which I thought that it would be worth sharing…
A lot of this will be standard for people who work with networking hardware all the time, but for those like myself who are more used to working with server hardware (or just the software) this might be new. First of all, as you can see from the ISAM Version 8.0 Quick Start Guide on the documentation website, the front of an ISAM physical appliance looks like this:

So we know that item (5) in the picture is the serial console port. I must admit I’m used to 9 pin D-type (or “DE-9” or “DB-9”) connectors for serial interfaces, but the socket is an RJ45 socket – just like the management and application Ethernet interfaces. The appliance ships with a cable that converts from RJ45 to 9 pin D-type (it has an RJ45 male plug on one end and a 9 pin female D-type connector at the other end. And it turns out that the wiring is standard – this is the same sort of cable which might come with a Cisco switch.)
In days gone by, laptops came with serial interfaces, but not any more. So after a quick search on Amazon I was able to get a USB to serial connector/adapter. (In fact I didn’t know that there was going to be an RJ45 to 9 pin cable with the appliance, so I bought an ‘HDE USB to Serial Interface Cable with Serial to RJ45 Console Adapter Cable for Cisco Routers’, which included both the USB to DB-9 adapter and a DB-9 to RJ45 cable.)
ISAM 9 update: according to the ISAM 9 documentation at http://www-01.ibm.com/support/knowledgecenter/SSPREK_9.0.0/com.ibm.isam.doc/isam90_quickstart_hardware.html
Your appliance package might contain a USB serial console cable and a DB-9 serial console cable, or the package might contain only a DB-9 serial console cable. If you use the USB serial console cable and your PC does not recognize the cable, you might need to install the device driver. The device drivers are available for download from http://public.dhe.ibm.com/software/security/products/infrastructure_protection/USBDeviceDrivers or from the driver supplier at http://www.prolific.com.tw/US/ShowProduct.aspx?p_id=225&pcid=41.
So it’s possible that you’ll also get a USB interface with the appliance. My work was with an ISAM 8 appliance, which pre-dated this…
Communications port details
The rest of this posting is written assuming you’re running Windows 7 on your workstation. No doubt users of other operating systems will be able to do something similar…
When I plugged in my ‘HDE USB to Serial Interface’ I saw this message:

– it’s worth making a note of the device details (COM17 in my case) as you’ll need this later. But if you don’t do this then all is not lost as you can go into device manager to get the details
Terminal emulation software
So then there was the question of what software to use to drive this USB serial adapter. I understand that earlier versions of Windows shipped with HyperTerminal, but not any more – however this isn’t a problem as PuTTY does the job perfectly well. PuTTY version can be downloaded from: http://www.chiark.greenend.org.uk/~sgtatham/putty/
Launch PuTTY, click Session, select the Serial radio button under Connection Type and specify the serial interface:
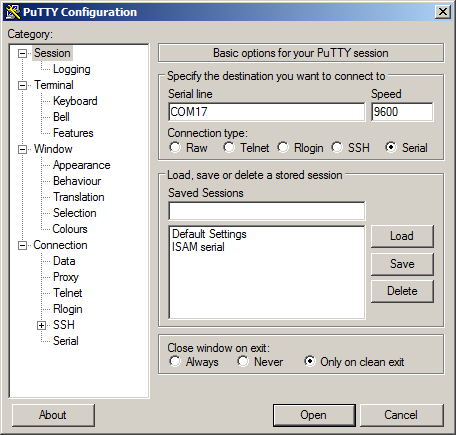
(where obviously the serial line – COM17 in my case – matches the name displayed when the device driver was installed).
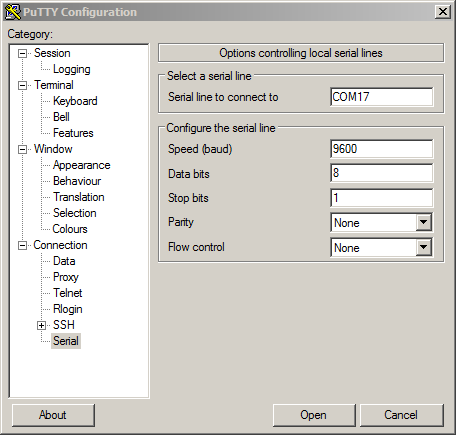
Then click Serial (bottom left) and set the communications parameters as shown:
DHCP Server approach
An alternative approach (which I haven’t tried but which a colleague has used) is to set up/use a DHCP server. Initially the appliance will use DHCP to search for an IP address, so it’s possible to set up a DHCP Server to issue an IP address to the appliance management interface, point a browser at that IP address, and then perform the configuration from there.
Leave a Reply